
Get in touch with LFADJ Company

Portable emergency lights are relocatable sources used to illuminate temporary industrial scene, movement, or task needs during an outage or incident. Comparing them requires more than lining up headline specifications. Buyers may start with wattage, lumens, battery capacity, mast height, and an IP rating, but those figures do not settle the field decision. The practical questions for a rechargeable light or backup light are where the light lands, what obstructs it, who could be affected, how long the real operating load can be sustained, and whether the equipment is ready when needed.
This resource provides a methodology for planning temporary lighting for industrial first responders, and provides recommendations regarding the selection, placement, operation, inspection, and acceptance of lighting. It sits within the broader field of industrial emergency lighting systems but doesn’t replace a site-specific risk assessment, relevant codes and legislation, or the design of required fixed emergency-lighting systems.
Critical boundary: a portable unit can support temporary work, incident response, maintenance, and continuity operations. It does not automatically satisfy code-required escape-route or building emergency-lighting duties. The UK HSE site-lighting guidance, for example, says emergency routes must remain well lit and that emergency lighting is required where failure of the primary artificial lighting creates a risk.
Portable Emergency Lights Are a Layer, Not the Whole Emergency System
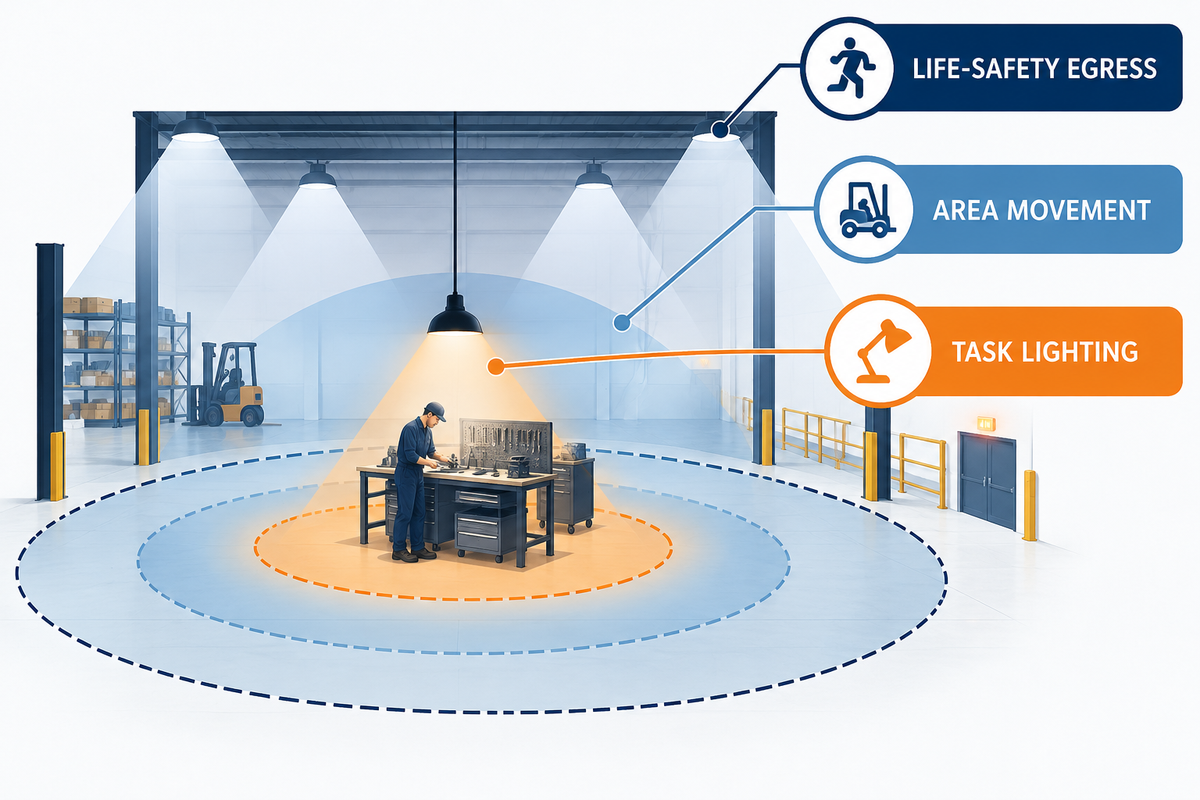
Begin by distinguishing three lighting functions. The first is life-safety egress: helping people identify and follow a safe route when normal lighting fails. The second is area movement: allowing people and vehicles to move around a temporary work or response zone. The third is task lighting: providing enough usable light to inspect, isolate, repair, rescue, load, or document.
These functions often overlap, but aren’t the same. A bright portable LED floodlight aimed at a machine can leave an escape path in shadow. A compliant fixed emergency lighting system may help people identify a corridor, but may not provide enough light to isolate an electrical source. “More lumens” isn’t always the best solution for a design challenge.
The Three-Layer Lighting Map
| Layer | Primary question | Typical proof |
|---|---|---|
| Life-safety egress | Can occupants find and use the required route after normal power fails? | Applicable code/design evidence and system test records |
| Area movement | Can people and vehicles move without hidden edges, obstacles, or conflicts? | After-dark walkdown from pedestrian and driver viewpoints |
| Task work | Can the actual work be performed accurately and safely? | Task-plane measurements plus operator observation |
Capture all three lighting functions—life-safety egress, area movement, and task work—before planning the supporting layer, including the work light assigned to the task. A fixed system carries an obligation that should be fulfilled by a qualified designer. Portable lighting becomes a deliberate supporting layer.
Define the Scene Before You Compare Equipment
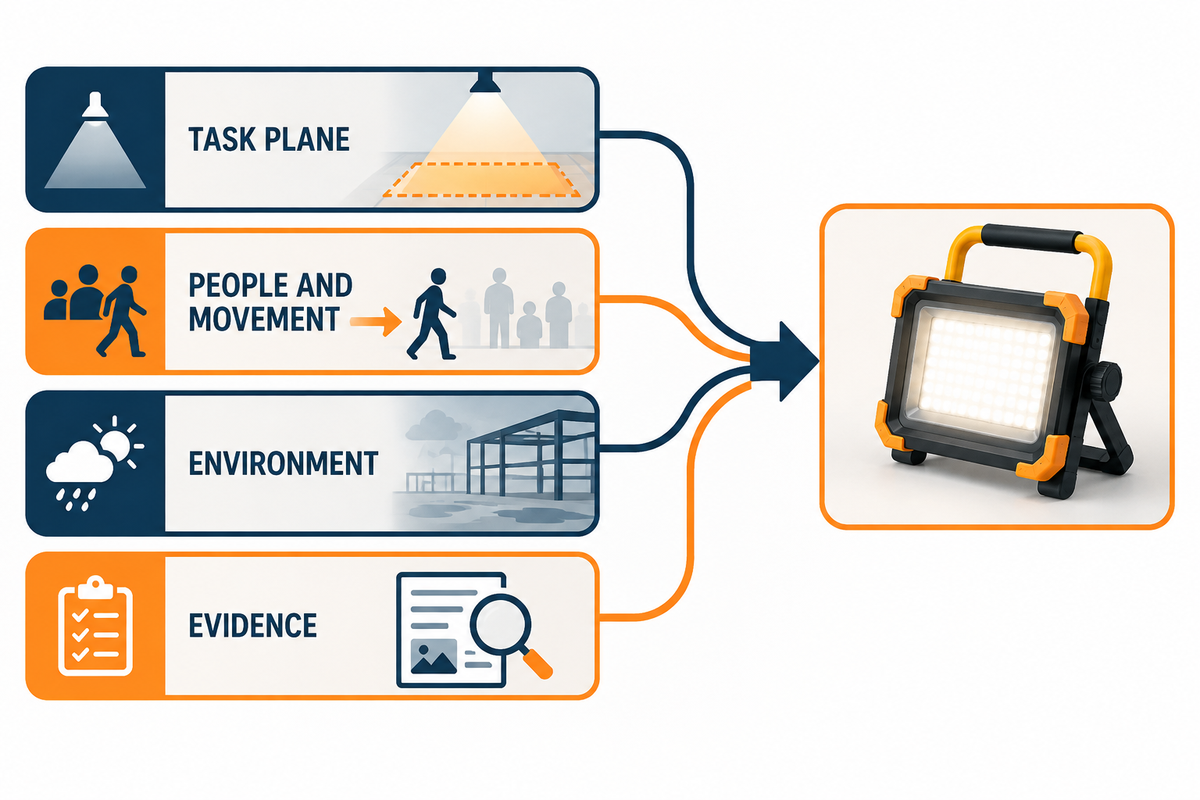
A specification should be based on the scene, not equipment. A catalogue shouldn’t dictate a design. An OSHA construction rule sets minimums while work is in progress, such as 5 foot-candles for general construction area lighting and 3 foot-candles for access ways, excavation and loading platforms. Asking, “Is there adequate light in the work area?” is more relevant than asking, “is there adequate electrical input at the lamp?” Systems should be tailored to the jurisdiction and the work activity being performed.
The Scene Requirement Card
Prior to seeking equipment recommendations for each zone, determine the following:
- Event: shutdowns, outages (planned, unplanned), rescues, temporary construction, inspection, recoveries.
- Task Plane: floors, control panels, machinery interiors, elevated work faces, loading surfaces, access routes.
- People and Movement: number of personnel, pedestrian paths, vehicle approaches, line of sight, adjacent operations.
- Geometry: dimensions of zone, available mounting locations, obstructions, reflective surfaces, movement of equipment.
- Duration: operating time, continuous period of use, shift time, recharge/refuel time, reserve time.
- Environment: atmospheric conditions (rain, dust, temperature, wind), exposure to the elements (corrosion, vibration), hazardous area classification.
- Evidence: required measurement grid, witness, documents, reinspection.
Watts describe electrical input. Lumens describe source output. To determine if illumination is adequate for a given task, a number of factors must be evaluated including shadow control, glare, and illumination uniformity. You must ensure that the equipment supplier connects the rating of the equipment to the task.
Match the Light Form to the Work Zone
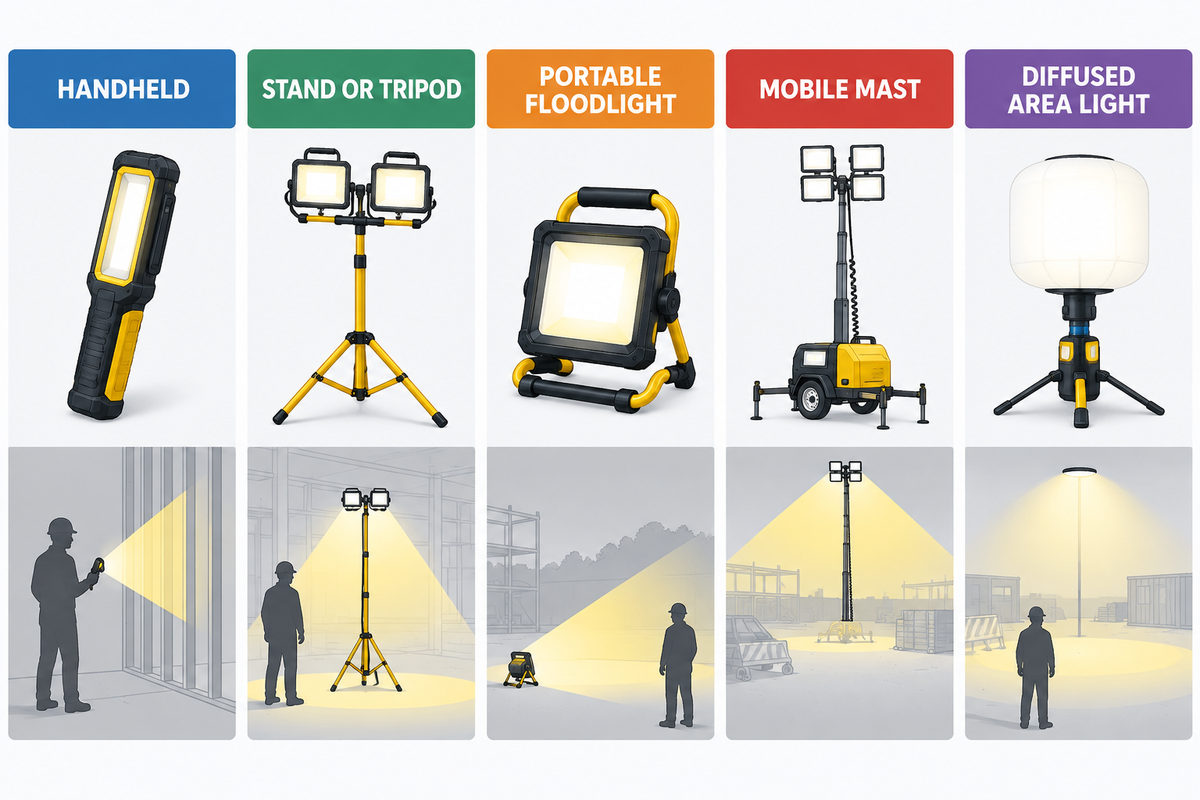
“Portable” includes several types of equipment. Choose by deployment pattern and primary function rather than by headline output alone.
| Light type | Good fit | Questions to resolve |
|---|---|---|
| Handheld or inspection light | Close inspection, confined access, tracing cables or components | Hands-free options, drop resistance, battery control, exact-area approval |
| Stand or tripod light | Small work fronts, rooms, maintenance bays, short relocations | Tip stability, cable routing, aiming range, deployment footprint |
| Portable floodlight | Broad temporary coverage from a protected position | Beam distribution, glare, shadowing, power source, weather exposure |
| Mobile mast system | Larger outdoor scenes, elevated projection, repeated relocation | Access, ground conditions, mast envelope, wind limits, power/runtime evidence |
| Portable area-light system | Fast deployment for a room or compact scene | Setup time, beam pattern, battery exchange, kit completeness |
| Magnetic or clamp-mounted light | Close-range work on compatible structures or machinery | Attachment security, surface compatibility, vibration, cable strain |
| Balloon or diffused area light | Broad low-glare coverage for groups and circulation zones | Wind exposure, mounting, diffuser damage, distribution evidence |
| Portable string-light system | Long access ways, tunnels, scaffolds, or repeated work bays | Voltage, spacing, suspension, connector protection, trip routes |
| Certified hazardous-location portable light | Classified areas when the exact assembly matches the classification | Certification marking, temperature class, accessories, power source |
A single high source may simplify logistics, but may create long shadows and a large single point of failure. Multiple lower sources may improve overlap and flexibility, but may create additional deployment and management complexity (i.e., increased cables, stands, charging and inspection points, and placement options). Compare complete deployments, not just the lamps.
For current configurations and other model-specific details, as well as for quotation discussions, access the portable emergency lights product page. The LFADJ company profile provides the manufacturer context; this guide deliberately omits commercial claims.
Build a Coverage Plan Around Shadows, Glare, and Movement
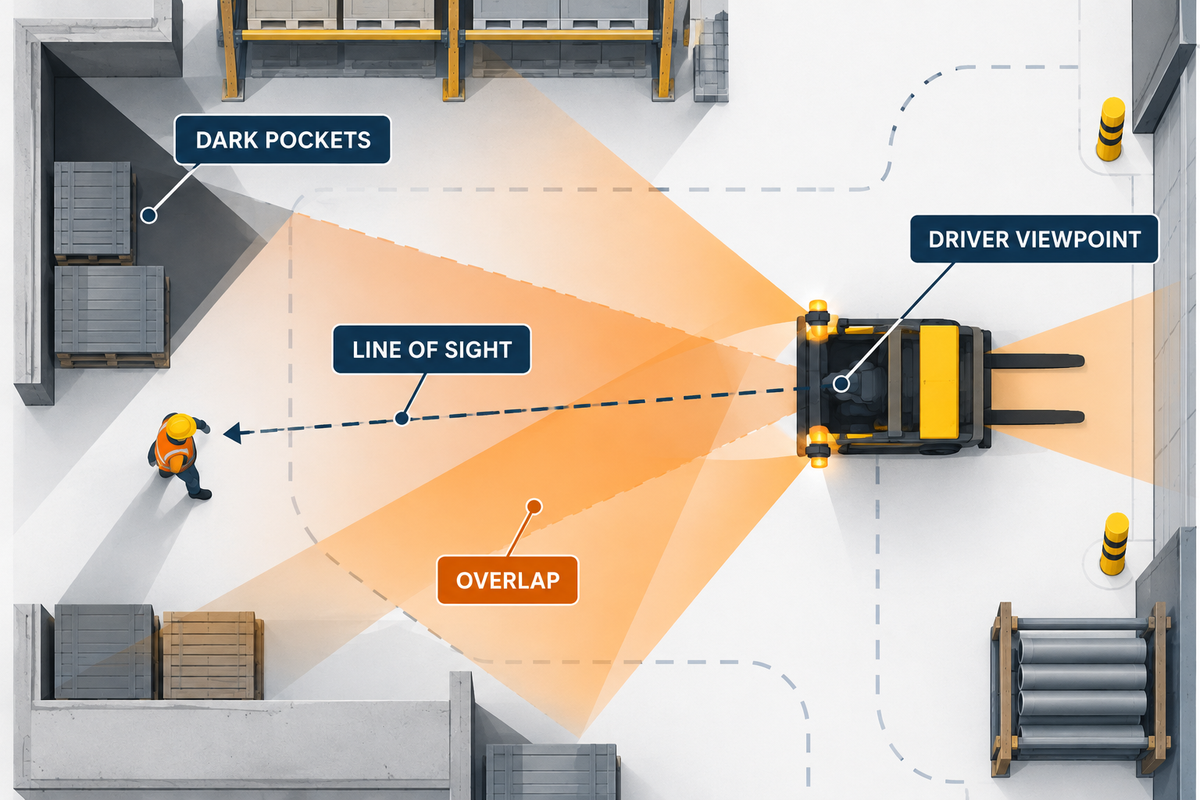
The HSE site-lighting guidance warns that shadows may conceal hazards and that additional lighting may be necessary where shadows form. Its workplace-transport lighting guidance recommends locating lights as high as practical and aiming them downward to reduce glare and harsh shadows. Apply these ideas to the actual workplace rather than reproducing a generic arrangement.
The Dark-Zone Walkdown
- Place the initial source outside the main movement path and shield it from contact.
- Aim the source across rather than along the normal line of sight.
- Walk the zone from worker eye height instead of just from the light position.
- Repeat the check from vehicle approaches, access gates, stairs, cameras, and adjacent work areas.
- Mark “dark pockets” behind machines, structures, stock, barriers and raised vehicles.
- Add or relocate sources to create overlap where a single obstruction or failure would leave a critical area dark.
- Recheck the zone whenever the work front, plant, barriers or storage is rearranged.
Check in the dark to observe glare, reflections, and low-contrast hazards. Define a working grid at the appropriate level and identify lowest readings and vantage points.
Plan Runtime With a Testable Energy Budget
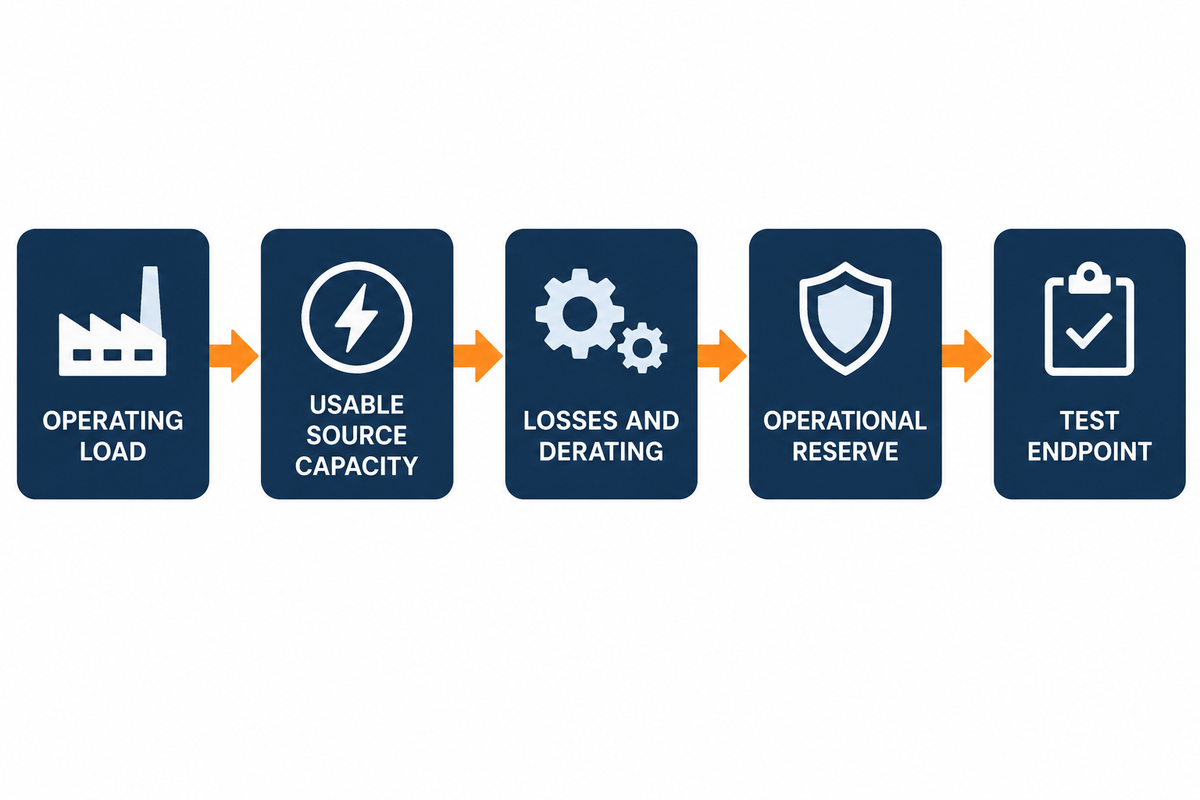
Runtimes are specific cases. They’re the product of a specific load, source, capacity, operating mode, environment, reserve, and end point. Operating a battery-powered light in economy mode is different from running a floodlight at full output while powering other loads on a mast.
The Runtime Evidence Chain
Build the chain in this order:
- Operating load: Lights, controls, cooling, mast, or auxiliary equipment in the mode you’ll use.
- Usable source capacity: Battery or fuel energy available before separately applying the documented losses and derating below; do not rely on nameplate capacity alone.
- Losses and derating: Conversion loss, temperature, aging, duty cycle, cable loss and manufacturer limits.
- Operational reserve: Energy held back to cover unexpected delays, relocation, degraded condition or other unknown conditions, and safe shutdown.
- Test endpoint: What defines the end of runtime: automatic shutdown, battery threshold, light level, other limit?
For any runtime claim, ask for the test configuration and check it against your Scene Requirement Card; the applicable work-area illumination requirement still has to be met for the task. If evidence uses a different mode of output, battery state of charge, temperature or test endpoint, the two figures aren’t directly comparable. For critical work, check runtime under a representative condition and load, and keep a documented backup or replenishment plan.
Screen Electrical, Generator, Weather, and Hazardous-Area Risks
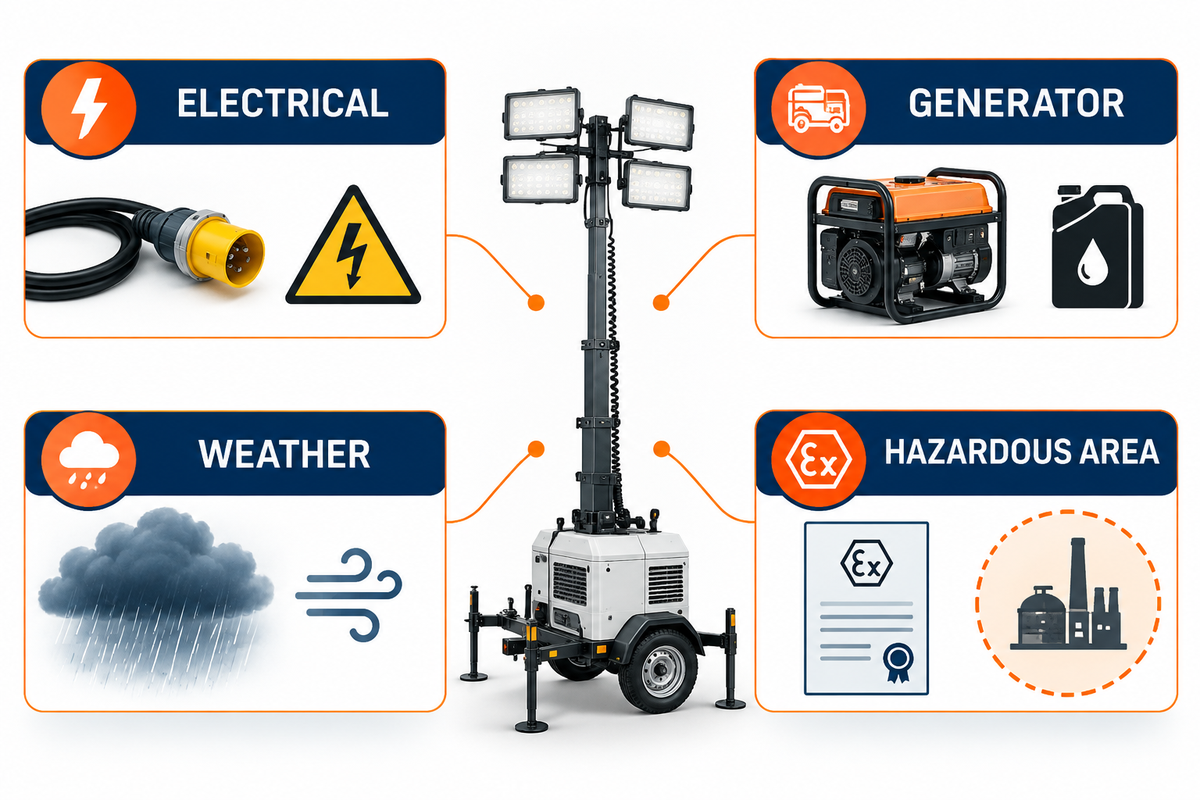
Portable lighting equipment can also move risk. Extension cords create trip and contact hazards, so include the cables, plugs, connectors, and protective devices in the electrical screen; the HSE electrical-safety guidance provides the broader workplace duty context. Connectors face exposure and contamination. Stands and masts can tip over on unstable supports. Generator power sources can create CO, fire, noise, and electrical hazards.
OSHA’s portable-generator guidance identifies carbon monoxide, shock and electrocution, fire, noise, and vibration as main hazards of portable generators. Engine driven equipment should be located outdoors, so that exhaust doesn’t enter partially or totally enclosed and occupied spaces. Requirements for electrical protection, grounding, clearance, and fueling, along with manufacturers’ instructions, should be followed; don’t invent one universal arrangement for all sites.
Judge weather resistance and hazardous-area suitability from the exact-model enclosure and hazardous-location documentation, not from appearance. An ingress-protection rating pertains to a specific test condition; it does not by itself establish wind stability, impact resistance, corrosion life, or hazardous-location suitability. Where flammable gas, vapor, dust, or fibers may be present, have competent personnel verify the area classification and the certification of the complete deployed assembly against current requirements and manufacturer documentation.
Inspect Before Use and Verify After Dark
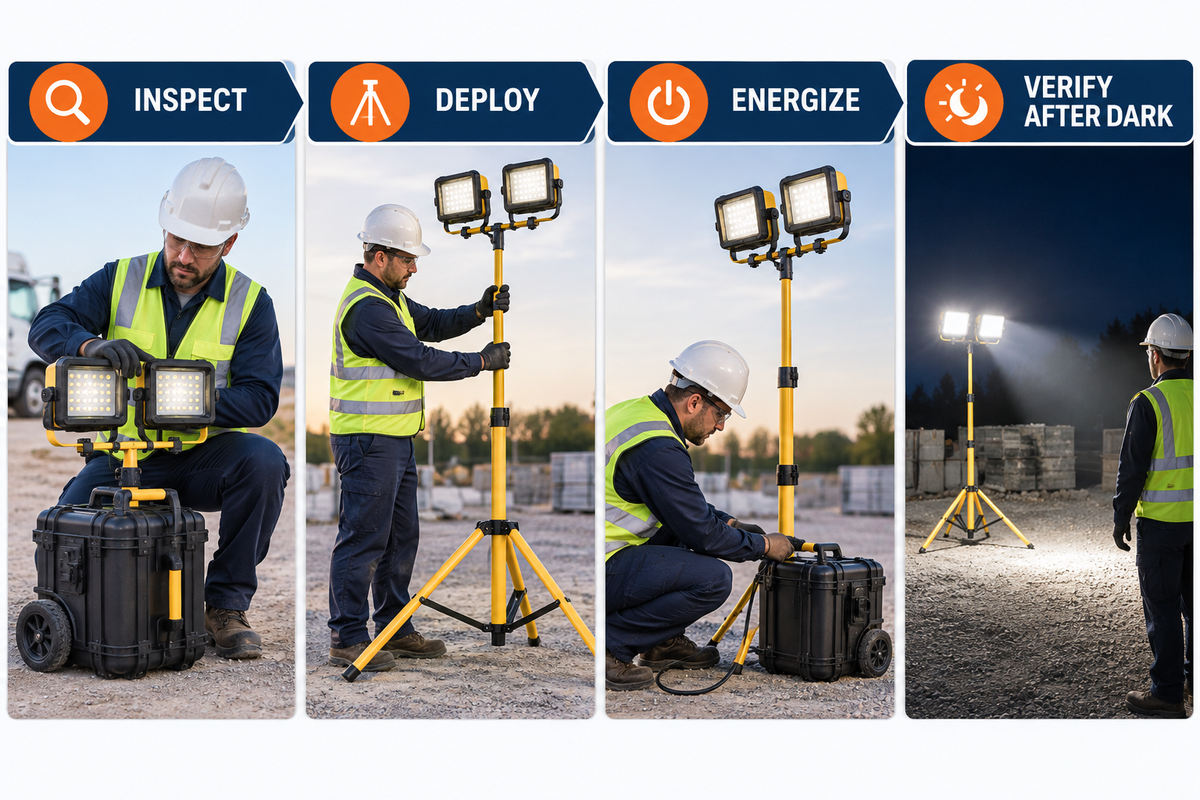
Emergency equipment that can’t be deployed, powered or trusted on arrival is inventory, not readiness; OSHA’s portable-generator guidance likewise calls for safe operating checks and manufacturer instructions where a generator supplies the lighting. Employ a short repeatable check before every deployment and a thorough inspection based on the type of equipment, the manufacturer’s recommendations, the operating environment and risk at the site.
The Ten-Minute Readiness Check
- Confirm equipment identity, inspection status, and the intended power source.
- Inspect housings, lenses, seals, handles, stands, and wheels for damage or missing parts.
- Check cables, plugs, connectors, and protective devices before energizing the equipment.
- Check the condition of the fuel/fluid or battery without bypassing manufacturer’s precautions.
- Operate moving mechanisms, locks, and emergency stops where fitted.
- Deploy the equipment on approved, protected ground and verify that routes remain clear for movement.
- Energize the equipment in the expected operating mode and look for abnormalities such as flicker, excessive noise, odor, or heat. The U.S. Department of Energy’s flicker research explains why modulation should be evaluated under the actual driver and operating condition.
- Complete the Dark-Zone Walkdown and any required task-plane measurements.
- Record defects, configuration, remaining energy or fuel, the responsible person, and conditions that require shutdown or repositioning.
Quarantine damaged equipment. Don’t change a defect into an informal operating restriction unless an authorized procedure and competent person approve that change. Shift handover should include the deployed arrangement, measured exceptions, changes in the work area, conditions that require shutdown or repositioning, and the status of equipment that has to be replenished.
Maintain Readiness Between Deployments
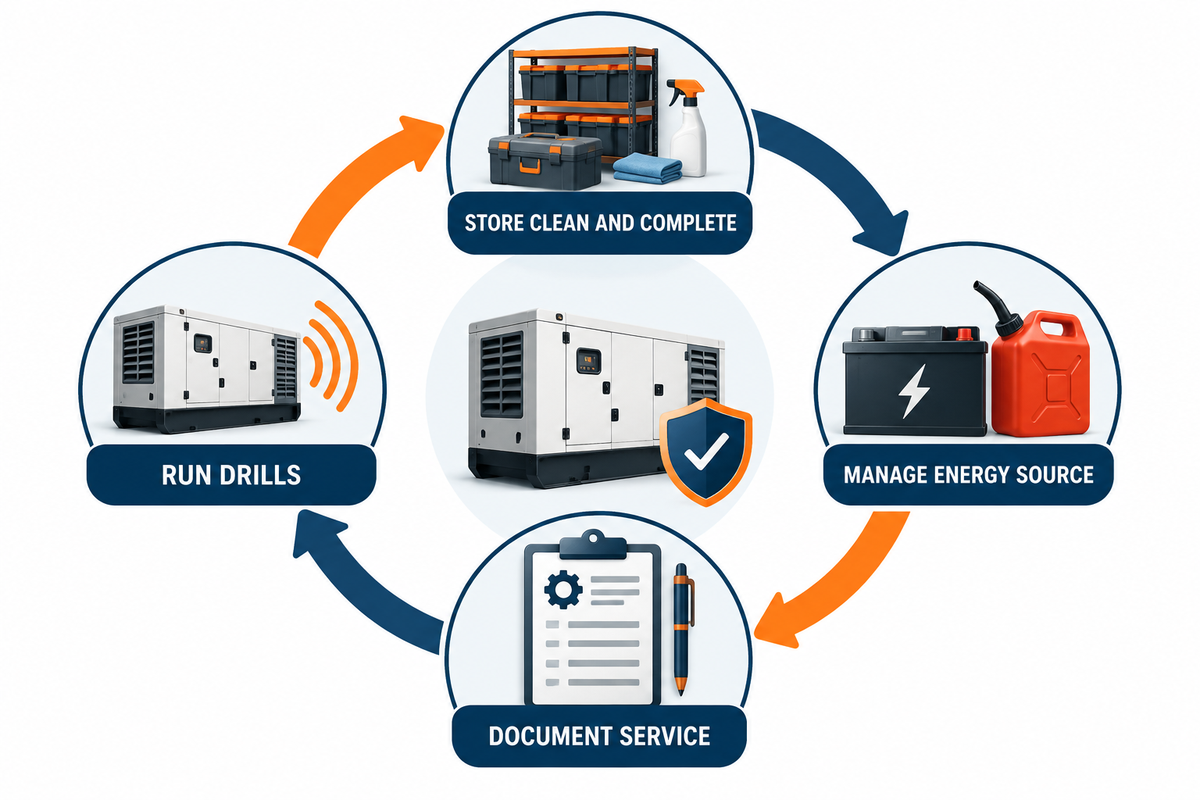
Storage is part of the system. Dry and clean equipment, protect lenses and connectors, keep stands and accessories with the equipment, and keep kits complete. Manage and store batteries according to chemistry and manufacturer’s instructions, including transport, inspection and replacement criteria. Exercise and service engine-driven units on a documented schedule based on instructions and risk, following the manufacturer-instruction boundary emphasized by OSHA.
Track equipment readiness with the last inspection date, location, ID, next action due, and battery or fuel condition. If equipment is stored in the emergency cabinet, this isn’t an equipment readiness status.
Emergency preparedness drills test the complete response including access to the equipment and the route, setup time, missing adapters, charging and/or fueling, communications and the after-dark verification. A drill typically reveals logistical deficiencies that a bench inspection can’t.
Write an RFQ and Acceptance Test Suppliers Can Answer
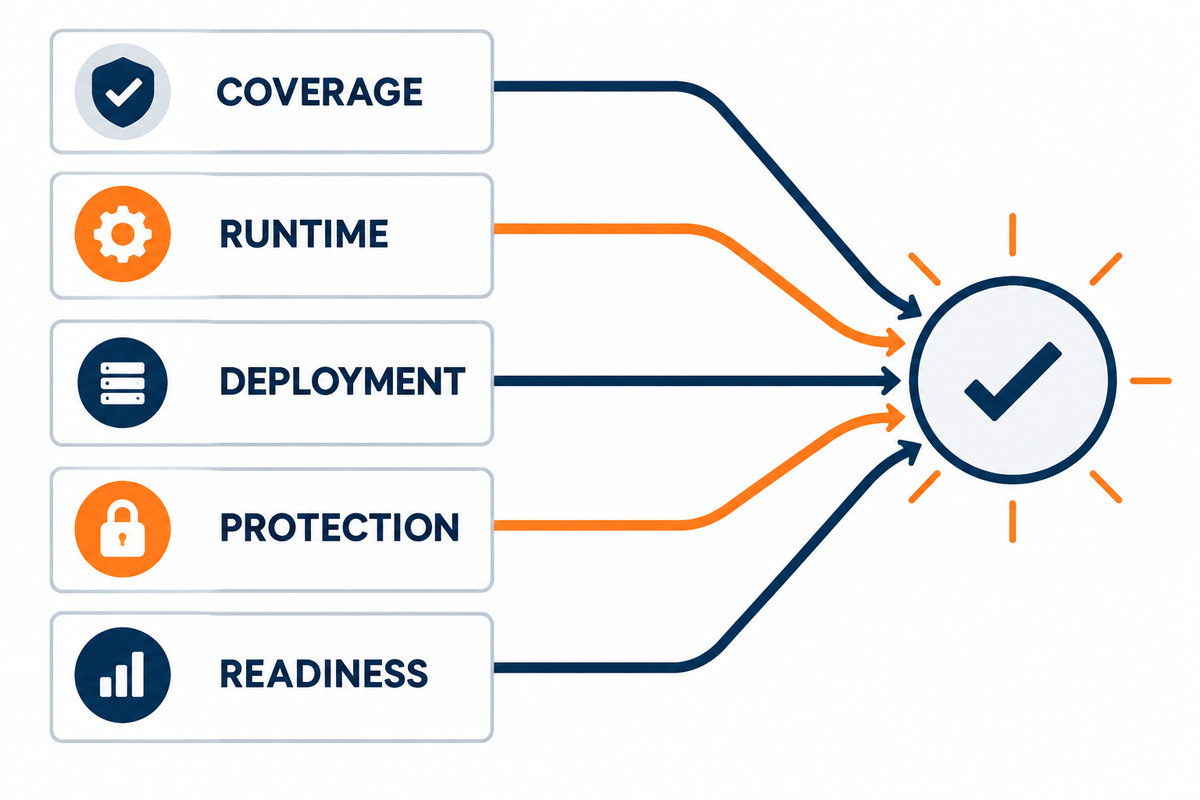
Comparable bids require comparable inputs, and any quoted layout should be checked against the applicable work-area illumination criteria rather than accepted on lamp ratings alone. Give all suppliers the same scene, task, operating schedule, access constraints, ground and weather conditions, power and lighting limitations, environmental constraints, and hazardous-material or classified-area information.
The Comparable Evidence Matrix
| Decision item | Evidence to request | Acceptance question |
|---|---|---|
| Coverage | Photometric file, layout, mounting/aiming assumptions | Does the proposed arrangement meet the defined task planes without unacceptable dark zones? |
| Runtime | Load mode, source condition, environment, reserve, and test endpoint | Is the claimed duration comparable with the planned duty? |
| Deployment | Footprint, access, setup sequence, stability and applicable wind documentation | Can the unit be placed and operated within the real site envelope? |
| Protection | Exact-model enclosure, electrical, and hazardous-location documentation | Does the complete assembly match the classified environment? |
| Readiness | Inspection, maintenance, storage, battery/fuel, spare-parts and support instructions | Can the owner keep the equipment ready over its service life? |
Verify that the delivered equipment matches the accepted identity and configuration. Deploy the equipment in the intended configuration. Review the runtime basis, check documentation, and observe light at the defined task planes. Record exclusions and unresolved assumptions. This makes “bright enough” a testable procurement decision.
Frequently Asked Questions
What is the difference between portable emergency lights and fixed emergency lighting?
Fixed emergency lighting is part of a facility system and supports defined life-safety functions such as escape routes. Portable emergency lights are relocatable sources for temporary scene, area, or task needs. They may supplement a fixed system, but they do not by themselves demonstrate compliance with egress or standby-lighting requirements.
How do I choose portable emergency lights for an industrial site?
Start with the Scene Requirement Card and define the event, task planes, movements of people and vehicles, geometry, duration, environment, power constraints, and evidence. Then identify the equipment type and quantity needed to provide the greatest coverage with the least distraction and manageable shadows. Check if the equipment is stable, protected, and serviceable, and if runtime is evidenced. Compare complete deployment assumptions and not watts or lumens.
How long should portable emergency lights run?
There’s no standard duration for each portable emergency lighting task; for comparison, where NFPA 101 requires building emergency lighting, that illumination must last a minimum of 1½ hours after normal lighting fails. Required duration comes from the incident plan, shift length, response and recovery strategy, recharge or refuel access, and reserve policy. Verify a supplier’s figure against the actual load, energy or fuel, temperature and derating conditions, and auxiliary loads. Evaluate battery or engine condition, and state the end point of the test. Critical deployments require a backup or replenishment plan instead of relying on nameplate data.
How should portable lights be positioned to reduce glare and shadows?
Place lights away from impact hazards and travel paths. Point lights across the task area and keep them out of workers’ line of sight. Raise the lights and aim them downward where suitable. Walk the scene at worker eye level. Look for loss of visibility, shadows behind equipment, and reflections of light from equipment and other sources. Repeat the check whenever the work front or obstructions move.
Can portable emergency lights be used in hazardous locations?
Yes, but only when the exact hardware and complete assembled deployment are suitable for the classified location and the installation follows applicable requirements. An IP rating describes ingress protection under a defined test. It doesn’t establish protection against ignition in an explosive atmosphere. Verify area classification, gas or dust group where applicable, temperature class, certification marking, accessories, connectors, power source, and operating limitations with competent personnel and current manufacturer literature before deployment.
Turn Equipment Into a Ready System
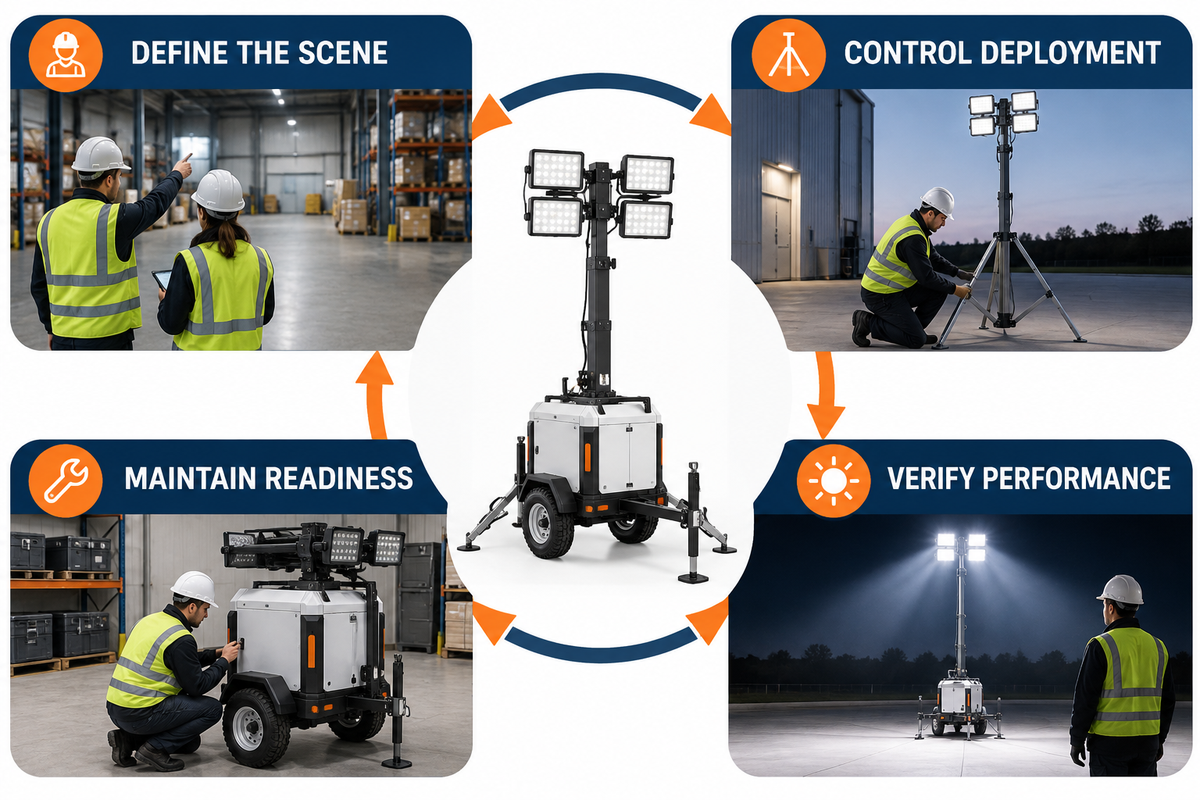
Assumptions rule portable lighting designs. In modular kits, assumptions, hazards, and inspections are baked right in. The strongest design is not necessarily the one with the largest headline output; HSE guidance makes the practical issue usable lighting without concealed hazards. Consider which lighting layer is needed, where useful light needs to land, what creates glare and shadow, how runtime was determined, how hazards were screened, who inspected the kit, and how the design will be accepted.
Use the Three-Layer Lighting Map, Scene Requirement Card, Dark-Zone Walkdown, Runtime Evidence Chain, Ten-Minute Readiness Check, and Comparable Evidence Matrix as one operating sequence. For adjacent fixed-system context, review LFADJ’s emergency-lighting overview. When you are ready to discuss portable configurations, use the product-page link above and submit scene inputs instead of a wattage-only request.