Get in touch with LFADJ Company

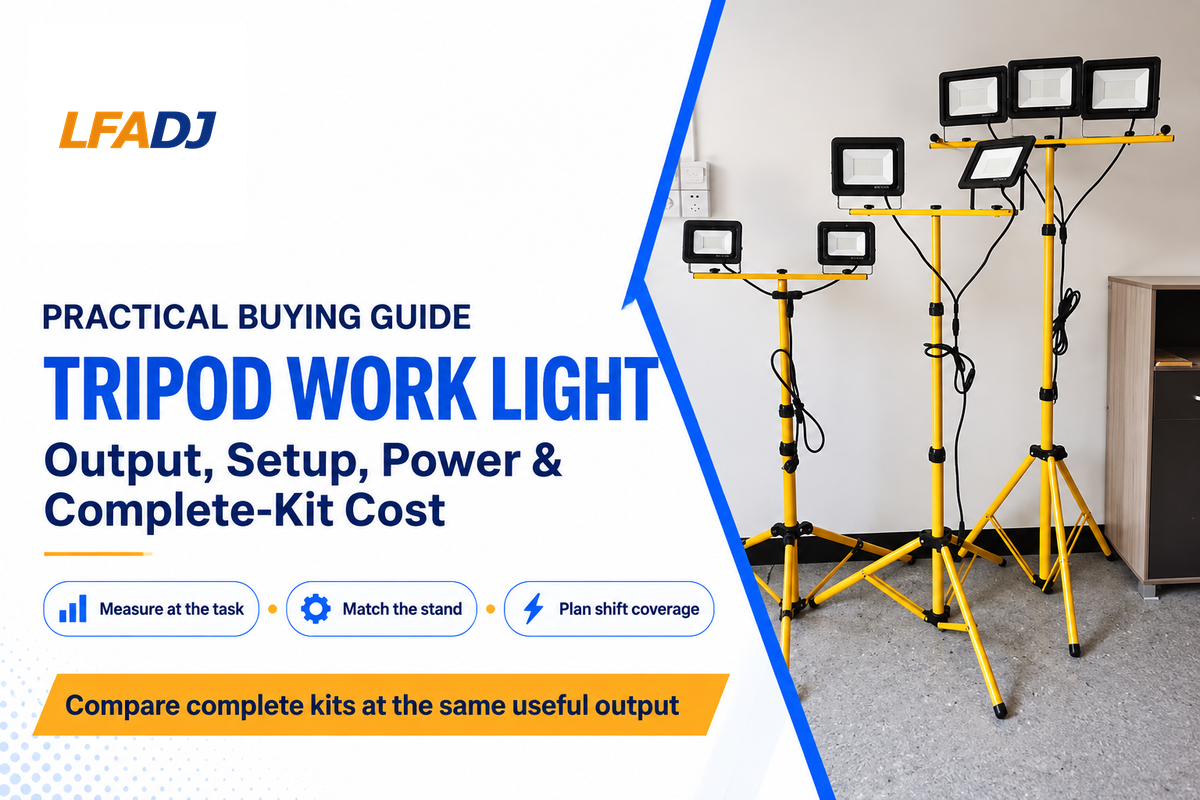
A tripod work light positions a lamp above the work area so you can direct light onto the job. Pick the output based on the task-plane illumination. Then adjust the stand and power supplies to the job site. For US construction, OSHA lists a 5-foot-candle minimum for general construction area lighting and 10 foot-candles for construction plants and shops.
A bright lamp may still leave a worker’s hands in shadow. Moving the head, changing its beam direction or adding light from another position can help more than buying a higher lumen rating. This guide will cover those options as well as battery planning. There will also be a cost analysis for a complete kit.
Updated November 2026
Quick selection guide
- Output: compare illumination at the task, with the lamp in its working position.
- Support: match the head, mount and permitted stand load.
- Power: compare runtime at the brightness setting you’ll use.
- Purchase: include batteries, charger, stand and delivery in the price.
A tripod work light is an elevated, adjustable task-lighting system. Choose it by measured work-plane illumination, a suitable stand and power that covers the shift. Compare complete kits at the same useful output.
How Many Lumens Does a Tripod Work Light Need for Job-Site Tasks?
For large or high-contrast tasks such as simple assembly, choose a lamp that delivers the CCOHS illustrative 200–500 lux at the work surface. Working distance and beam spread will impact the results, and the task area will also play a role. Retail examples include a DEWALT stand light (3000 lumen) and a Husky tripod light (10000 lumen).
Think of a flashlight: its center can look intensely bright while the surrounding floor remains dim. A flood head spreads its output over a wider area. This difference is why two products with similar lumen figures can be used for different tasks. Consider the task and the working distance, and compare information about the beam spread for that arrangement.
The Lowe’s stand-light listings include the DEWALT example, and the Husky listing is included in the price comparison below. They’re product examples, not the recommended output range for every site.
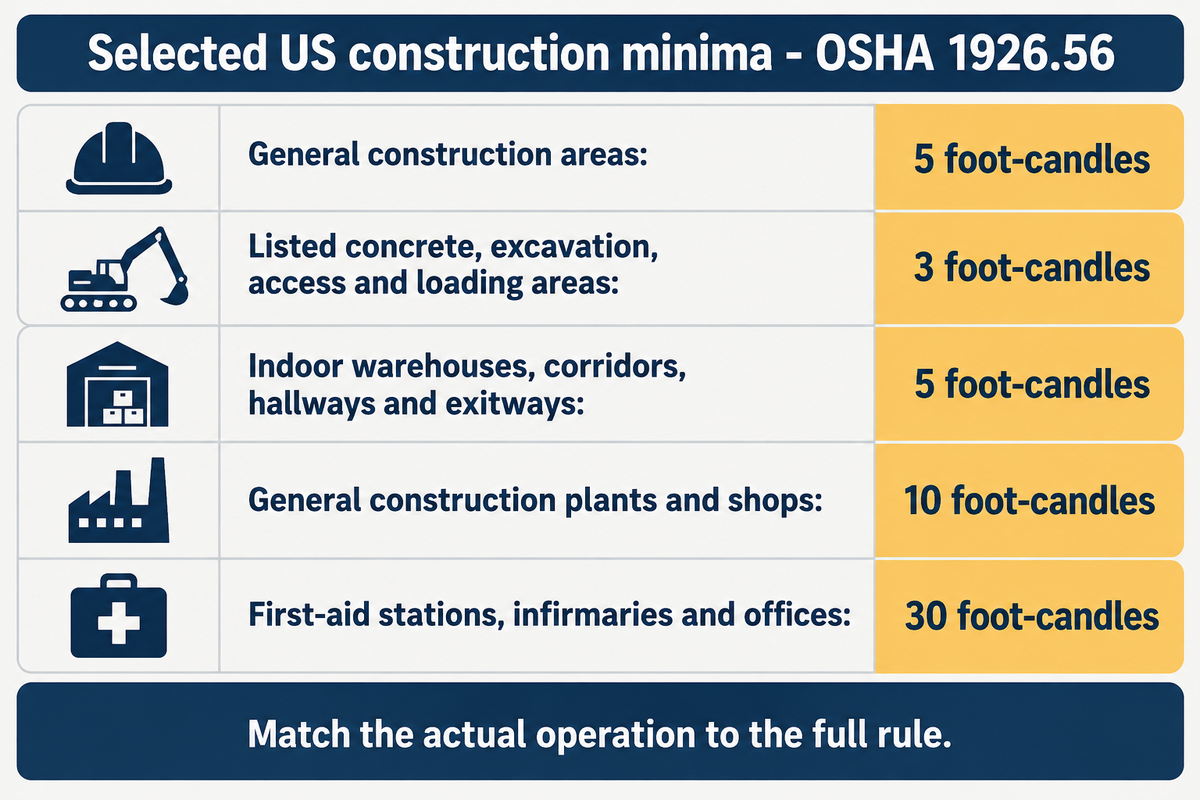
“Construction areas, ramps, runways, corridors, offices, shops, and storage areas shall be lighted to not less than the minimum illumination intensities listed in Table D-3 while any work is in progress:”
| Area or operation | Minimum |
|---|---|
| General construction area lighting | 5 foot-candles |
| Listed concrete placement, excavation, access, loading and related areas | 3 foot-candles |
| Indoor warehouses, corridors, hallways and exitways | 5 foot-candles |
| General construction plants and shops | 10 foot-candles |
| First-aid stations, infirmaries and offices | 30 foot-candles |
These are selected activity-specific rows from OSHA 1926.56, Table D-3. Match the actual operation to the full rule; detailed inspection may require more illumination than the area’s minimum.
The CCOHS lighting survey guidance also gives 500–1000 lux for smaller or medium-contrast visual tasks and 1000–2000 lux for very small or low-contrast tasks. These are advisory task categories, and don’t replace construction requirements in the U.S. Measure at the actual surface on which the work is being done, whether it be horizontal, vertical, or at an angle.
Task-Plane Light Check
A Task-Plane Light Check records whether the selected lamp lights the work clearly from the worker’s position throughout the required shift.
Use this worksheet during a trial. The employee fills in the setup and visibility observations. The Site Safety Representative decides which criterion is applicable. Purchasing can then compare a replacement product against the same conditions.
| Record | Where or how | Decision it supports |
|---|---|---|
| Task and surface | Name the operation and the surface being viewed | Select the relevant illumination criterion |
| Criterion and units | Record the applicable foot-candle or lux value | Keep legal minima and task recommendations distinct |
| Head position | Record height, aim and distance to the work | Repeat the setup with another lamp |
| Output mode | Record the brightness setting and power source | Compare the same operating condition |
| Task readings | Measure the work area, including its dimmest working points | Find edges that need repositioning or more coverage |
| Worker shadow | Repeat with the person and tools in working position | Move the source or add another direction |
| Glare | Check direct views and reflections from normal eye positions | Change aim, position or brightness |
| Shift readings | Repeat at planned intervals and near shift end | Identify output loss before the work becomes difficult |
| Access and changeover | Walk the route and rehearse the battery change | Keep exits clear and maintain needed lighting |
What Is the Difference Between a Light Stand and a Tripod Work Light?
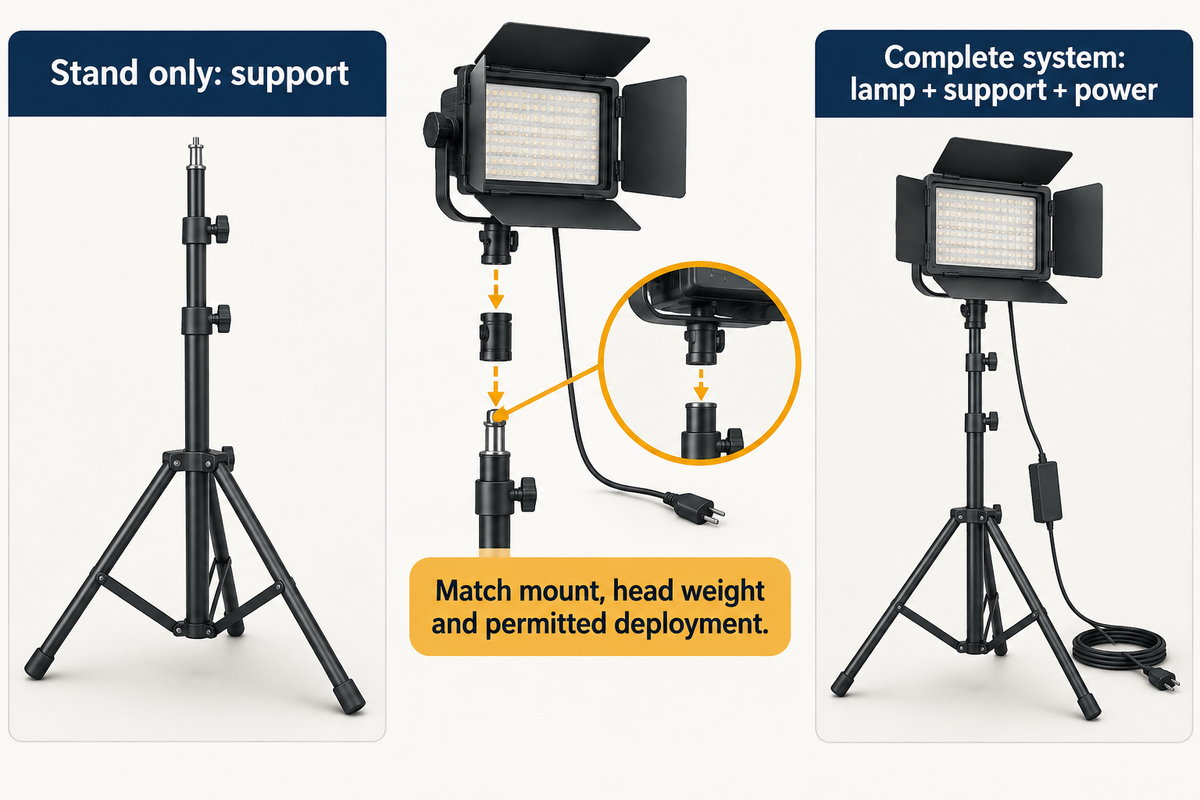
A work light stand is the support; a complete tripod work light also includes a lamp and its power arrangement. Buying the parts separately allows a flexible setup, but the mount, head weight and allowed deployment must match. A compact tripod that carries a small lamp may be unsuitable for a larger dual-head assembly.
A tripod describes a three-legged base. A light stand describes what the support holds. A light stand can therefore have a tripod base. The height of the support can be compared after the attachment of the lamp is checked. Different interfaces can be found such as a threaded tripod mount, a smooth stud and a proprietary bracket. Use a combination the equipment manufacturer permits, including its specified fasteners and head orientation.
Product classification matters too. IEC 60598-2-4:2017 covers portable general-purpose luminaires other than handlamps, at supply voltages up to 250 V.
When a task is low and an elevated mast adds little, a floor stand should be used. A suitable clamp or magnetic mount can keep a bench clear, provided the supporting surface and attachment are approved for the load. A hanging hook also needs its own permitted load and an approved fixing point. When an elevated assembly is used, avoid building an improvised assembly from whatever fittings are available.
For jobsite portability, test the handle, folded balance and locks while wearing the gloves used on the job. The collapsible design folds for storage to save space, only if the crew can fold, carry and reopen it without losing the loose fittings.
How Should You Set Tripod Height and Aim to Reduce Glare?
Set a telescoping tripod work light within its model’s adjustment range: the BRAUN 71096, for example, adjusts from 47 to 75 inches. Within that range, raise and aim the head to clear the obstruction casting the shadow, and from the worker’s position, check for glare and adequate task lighting.
The BRAUN product listing describes the model’s travel. Height adjustment to reduce glare may be useful in some setups; however, the setting may vary depending on the employee’s position, surrounding obstructions, and the sheen of surfaces.
In a garage service bay, a lamp behind the mechanic can project their body shadow across an engine compartment. Moving it to the side may reveal the fastener immediately. If the mechanic’s hands are still blocking the beam, casting a shadow, light from a different angle may be helpful. This is a placement problem before it’s an output problem.
On glossy paint, sheet metal or glazed surfaces, inspect the reflection as well as the lamp itself. Move your position within the normal working range. A head that’s comfortable when standing may reflect into someone’s eyes when they kneel. The CCOHS survey method considers glare, reflected glare, and shadows as different observations.
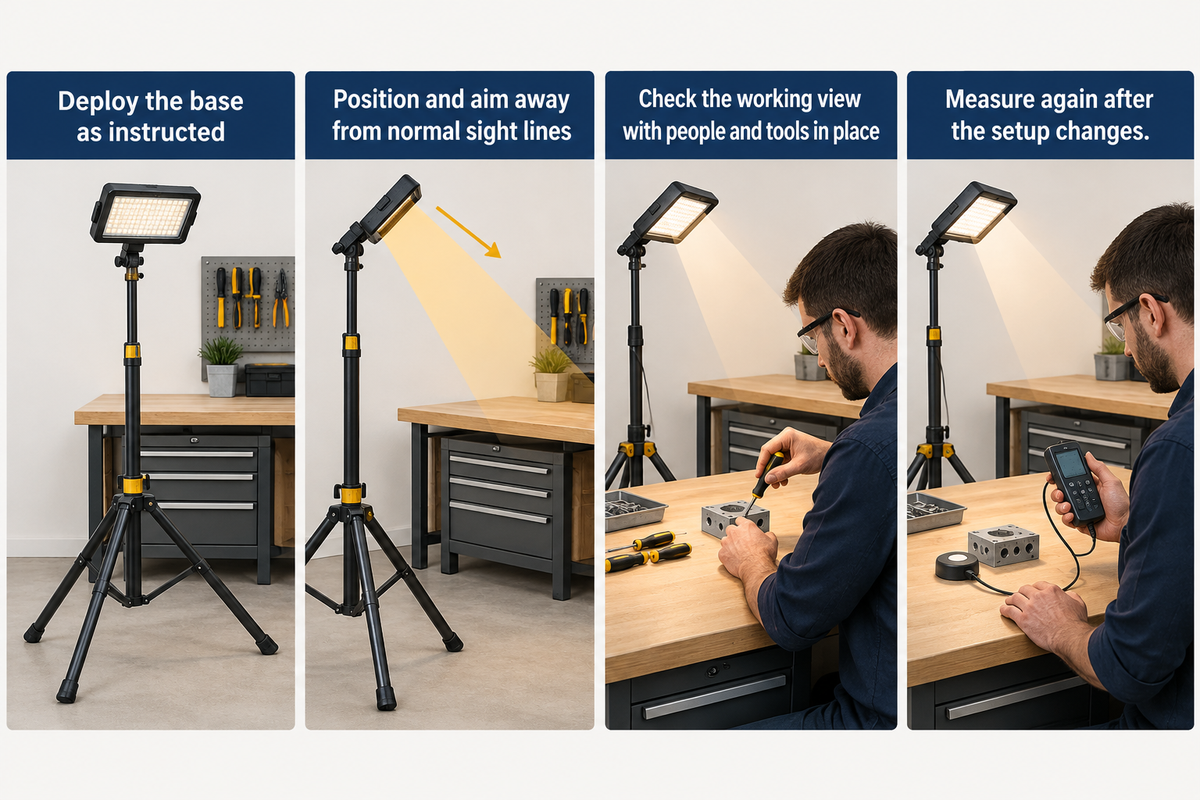
- Deploy the base with its legs, feet and locks set according to the model instructions.
- Position and aim the head to clear the obstruction while keeping the lamp out of normal sight lines.
- Check the working view with people and equipment in place, then adjust the direction or add another source.
- Measure again after the setup changes, including the edges and shadowed points.
When considering work done outdoors, include the view from vehicle approaches and nearby work positions. A head aimed comfortably for the operator may still shine toward people approaching the work area. If the work area has multiple possible access points, a placement plan may be needed to account for all access and the immediate work area. Our mobile lighting systems guide addresses larger layouts.
Corded or Rechargeable: Which Power Option Covers an 8-Hour Shift?
For a stationary 8-hour job with a suitable, protected supply, corded power avoids the need to change batteries. A rechargeable work light with stand suits a job that requires moving about and places where a cable would restrict access. Size the battery arrangement to accommodate the runtime at the selected output, including the lighting needed during a pack change.
Corded AC
- Suited to a fixed work area with a suitable supply.
- Requires a protected cable route and appropriate connections.
- Supply interruptions need a separate lighting plan.
Rechargeable battery
- Suited to frequent moves and cable-free deployment.
- Requires enough charged capacity at the working mode.
- Pack changes and recharge availability need planning.
Runtime comparisons are useful only if the setting of the output is known. A long low-mode duration and a short max-output duration describe different jobs. The selected mode still needs to provide the illuminance required for the task near the end of the shift, when the lamp may remain on but give off less useful illumination.
How can you estimate battery coverage?
To estimate hours, divide usable energy in watt-hours by average battery-side load in watts. Then divide the required operating period by the duration and round up to the number of fully charged packs. Account for auxiliary loads, output changes and charge time.
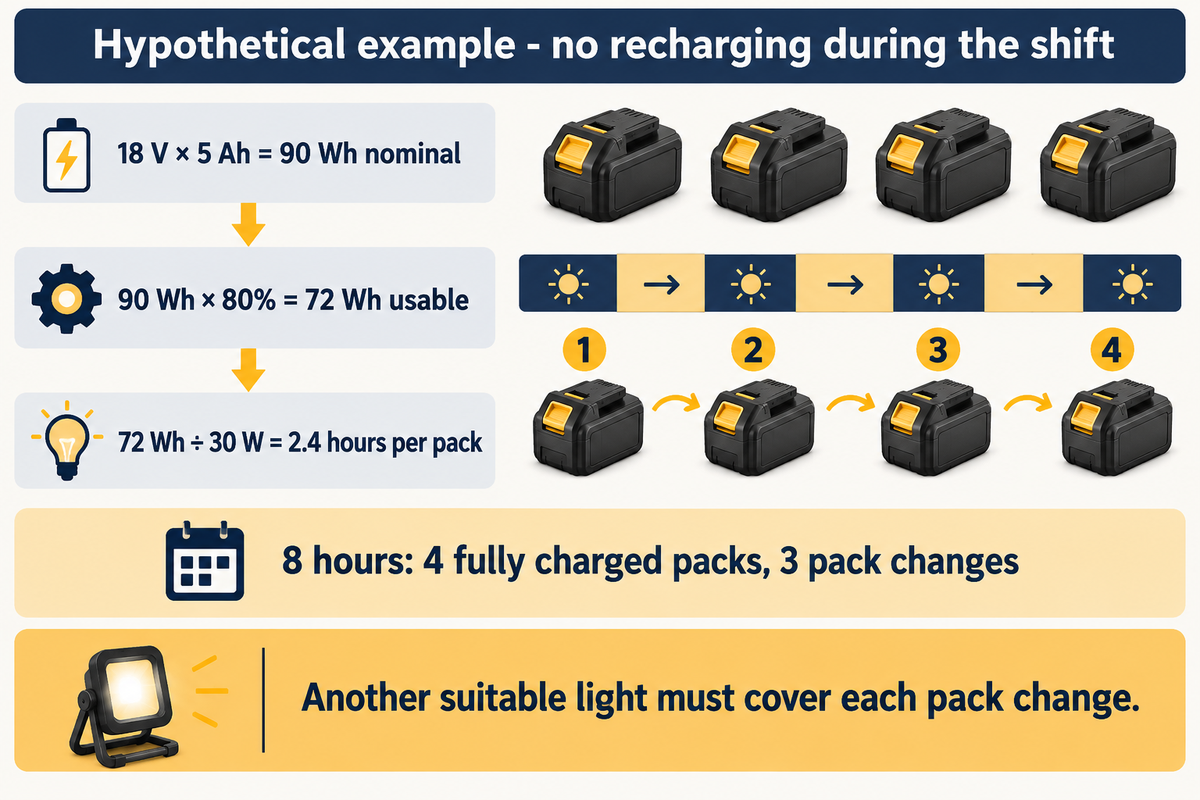
Assumed inputs: an 18 V, 5 Ah pack, 80% usable energy and a constant 30 W battery-side load. Assume each pack is fully charged and no energy is recharged during an eight-hour shift. These inputs describe a worked example, not a particular brand’s measured performance.
Nominal energy: 18 V × 5 Ah = 90 Wh.
Usable energy: 90 Wh × 0.80 = 72 Wh.
Estimated runtime: 72 Wh ÷ 30 W = 2.4 hours per pack.
Eight-hour coverage: round 8 ÷ 2.4 up to 4 fully charged packs.
This requires 3 pack changes. For work that requires continuous illumination, another suitable source must cover each pack change. The construction illumination requirement must be met as work progresses. Reducing the setting can extend runtime only while the task remains adequately lit. The LFADJ shift coverage planner can be used to plan operating periods and charge windows.
Chargers may be the hidden bottleneck on consecutive shifts. Enough batteries for one shift may still leave too little charging capacity for the next shift. Count charger positions and the charging window. Assess packs already assigned to power tools. A hybrid power option may be used to alleviate the bottleneck if allowed by the model. However, AC operation and simultaneous battery charging are separate features.
Single or Dual Head: Beam Coverage, Color Temperature and Detail
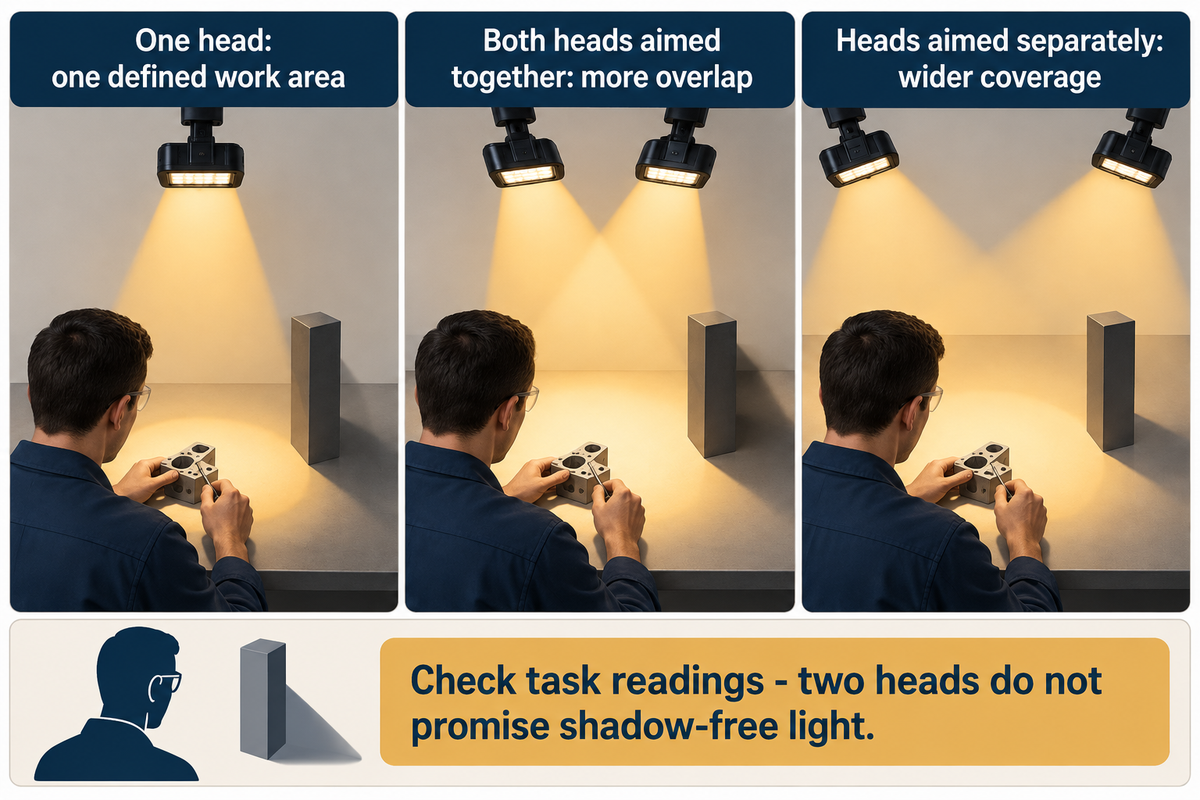
Choose one head for one defined work area. A dual head tripod work light can be used when independently aimed beams can serve different tasks or fill in shadows. Color temperature describes how warm or cool the light appears. Color rendering describes how things look under light. Judge the sample under the lighting used while working as well as the lighting used to view the finished result.
A broad flood can light an open workspace evenly enough for movement, while a narrower beam can concentrate light on a distant point. Turning both heads to the same area results in more overlap. Aiming separately results in less overlap, but wider coverage. Keep the task-plane readings with the chosen arrangement rather than treating the two-head label as a promise of shadow-free light.
For sanding, a beam directed across the surface can help reveal ridges. For painting or inspection, glare from a glossy surface can conceal detail even when the meter reading is high. Judge the visibility of the actual finish, with the observer in the position used for the work.
A cool-looking LED work light doesn’t always mean better color distinction. When color decisions matter, compare the color temperature and color-rendering data on the spec sheet, then inspect a representative finish or component. The final condition of light should be used for making the final decision. The CCOHS survey guidance states that effective lighting should include consideration for color appearance.
A demonstration video can help show head adjustment, but a YouTube camera’s exposure and white balance can change the apparent brightness and color. Use the video to assess handling, and use measurements and a sample trial to assess lighting.
How Do You Check Stand Stability and Outdoor Protection?
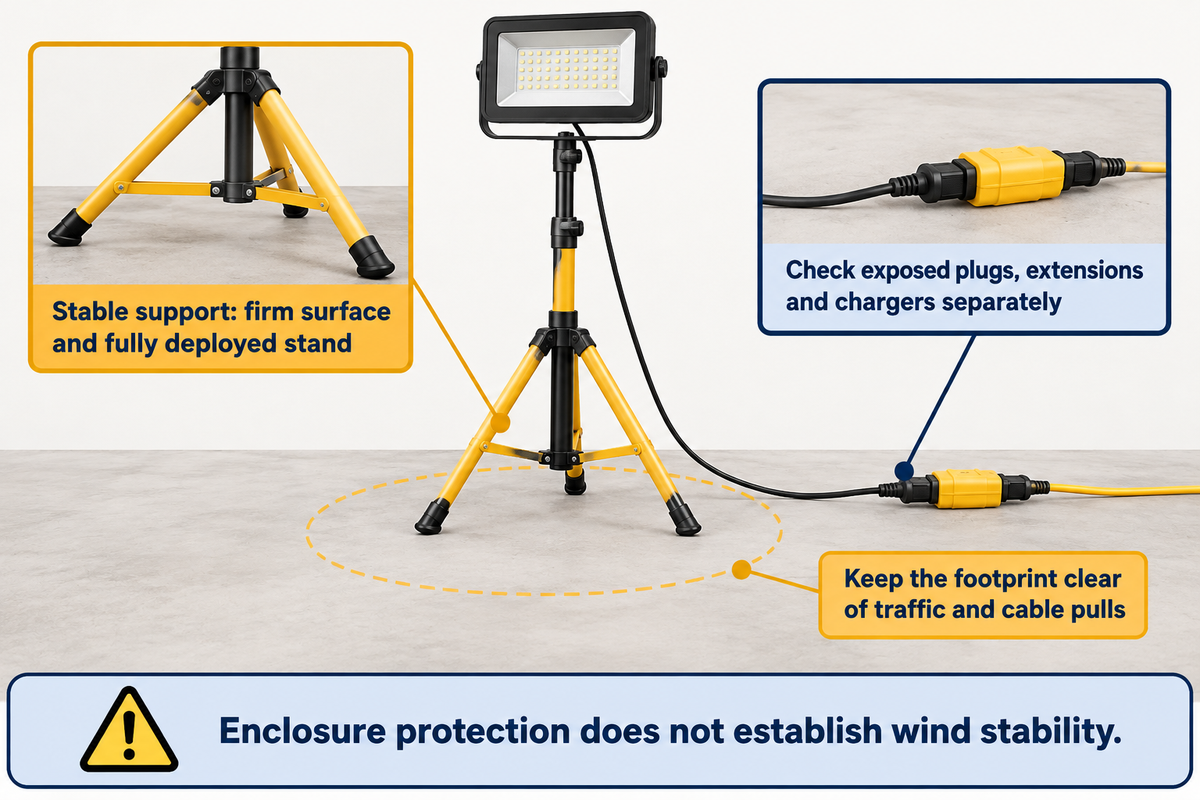
A work light needs a firm, appropriate surface and a fully deployed stand before the mast is extended. Keep the required footprint clear of traffic and cable pulls. For outdoor use, check the model’s exposure and wind instructions separately from its enclosure rating; these address different failure mechanisms.
A tall lamp head gives wind and accidental contact more influence over the base. Raising the head increases the turning effect of a sideways force, so a setup that feels stable while folded still requires the prescribed deployment check. Don’t hang an improvised counterweight from a hook unless that use is permitted.
Route the cord so a passing person or moving tool can’t pull it across a leg. On sloping or soft ground, use equipment approved for that surface and deploy it as instructed. If the position of the support can’t be corrected, either relocate the task lighting or select a different support system.
Check protection for each exposed part of the assembly. An LED tripod work light may have a protected head while its plug, extension connection or charger needs shelter. Protecting a head doesn’t ensure that the equipment meets the requirements of hazardous locations. When conditions change beyond what the equipment’s instructions permit, the equipment must be switched off and repositioned. The supply protection arrangements for US construction are covered separately in OSHA 1926.404.
For repeated mobile use, inspect the locks, feet, hinges and lens before deployment. Damage that allows a head to sag alters the direction of the beam and the load on the support. A bulb or module, if replaceable, is useful only if that part is approved for that product. Improper electrical repairs, for example, can alter protection and operation.
What Electrical Safety and Certification Details Should You Check?
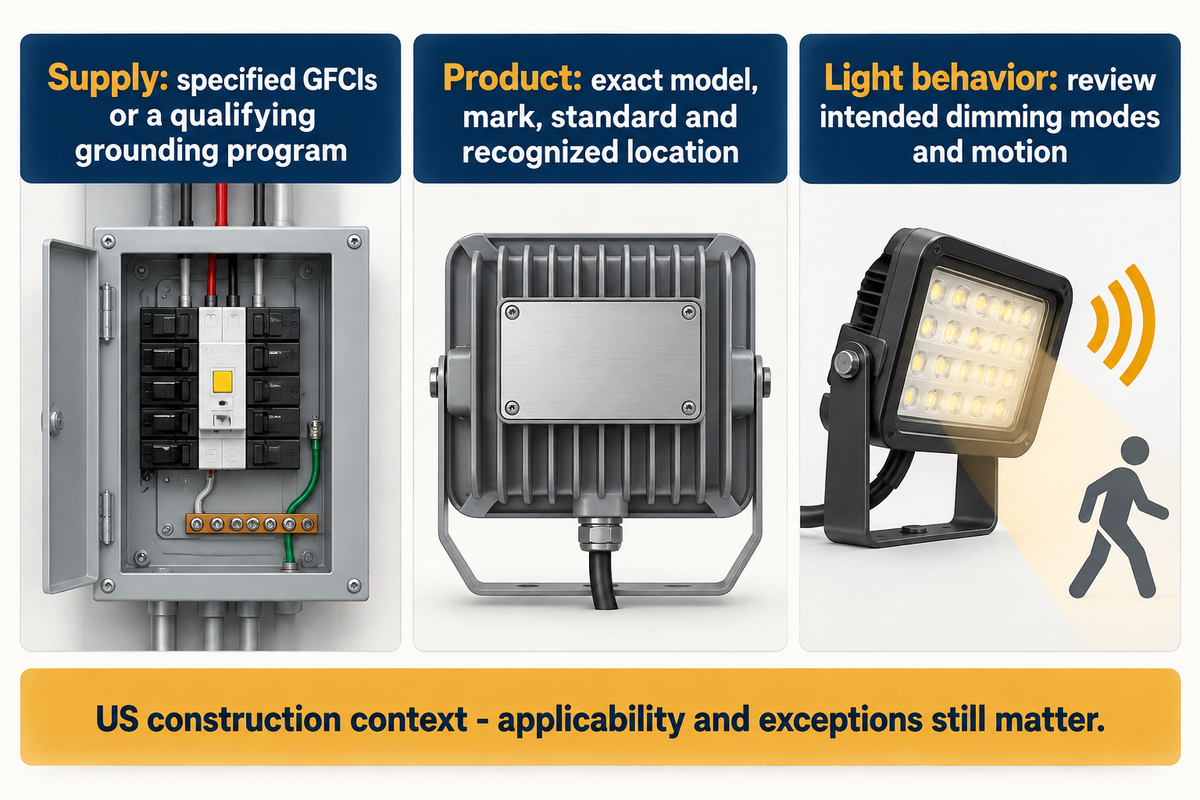
Construction work lights should be inspected to ensure that the supply and the lamp’s product approval are in compliance. Specified GFCIs or a qualifying assured equipment grounding conductor program are permitted in OSHA 1926.404(b)(1). For the lamp, check the exact model and its certification against the testing laboratory’s accepted scope and location.
The OSHA construction wiring rule includes specified 120 V, single-phase, 15 A and 20 A nonpermanent receptacles in its ground-fault circuit-interrupter provisions. Applicability, exceptions and the alternative program belong in the site’s electrical safety program. Have a qualified person select the program and appropriate cords and connections.
Inspect cord-and-plug equipment before use and remove damaged equipment from service according to the site’s procedure. Keep connections away from exposure they aren’t rated to withstand. A weather-resistant head doesn’t protect an unsuitable supply connection.
OSHA’s recognized-testing-laboratory guidance explains the mark, recognized standard and recognized certification-location checks. A CE mark isn’t a substitute for applicable US workplace product approval. Search the certification record for the exact model ordered rather than relying on a different model from the same brand.
The UL 153 catalog lists Edition 13, published in 2014 and last revised in 2025. Its scope clause 1.5 points battery-equipped work lights and portable hand lights to UL 1576. Select the applicable classification before requesting a certificate; a generic portable-luminaire claim is too broad.
Temporal modulation of light should also be considered. The flicker research from the US Department of Energy distinguishes direct flicker, stroboscopic effects and phantom arrays. Driver loading and dimming can change behavior. Indicate intended modes and motion in the equipment review, especially when there’s a risk of misleading appearance of moving parts creating a hazard.
What Does a Tripod LED Work Light Cost as a Complete Setup?
One US retail reference is USD 119 for Husky’s 10000-lumen corded tripod model 7901309012 at Home Depot, checked on November 17, 2026. For a purchasing decision, you must evaluate the complete set of equipment required for the same task over the same period.
The Husky listing includes an 8 ft cord; the displayed location was Middletown, Rhode Island. The regular price of this Husky model is different from the advertised credit card promotion. Delivery, tax, and any extra site equipment each need their own line item.
Another dated reference is the BRAUN 71096 multidirectional corded tripod light: Harbor Freight listed it at USD 99.99 on November 17, 2026, with North Miami Beach, Florida selected. Together, these examples provide two specific purchasing references. They don’t establish market-wide price tiers or the cost of a rechargeable kit.
Compare two kits at the same useful output
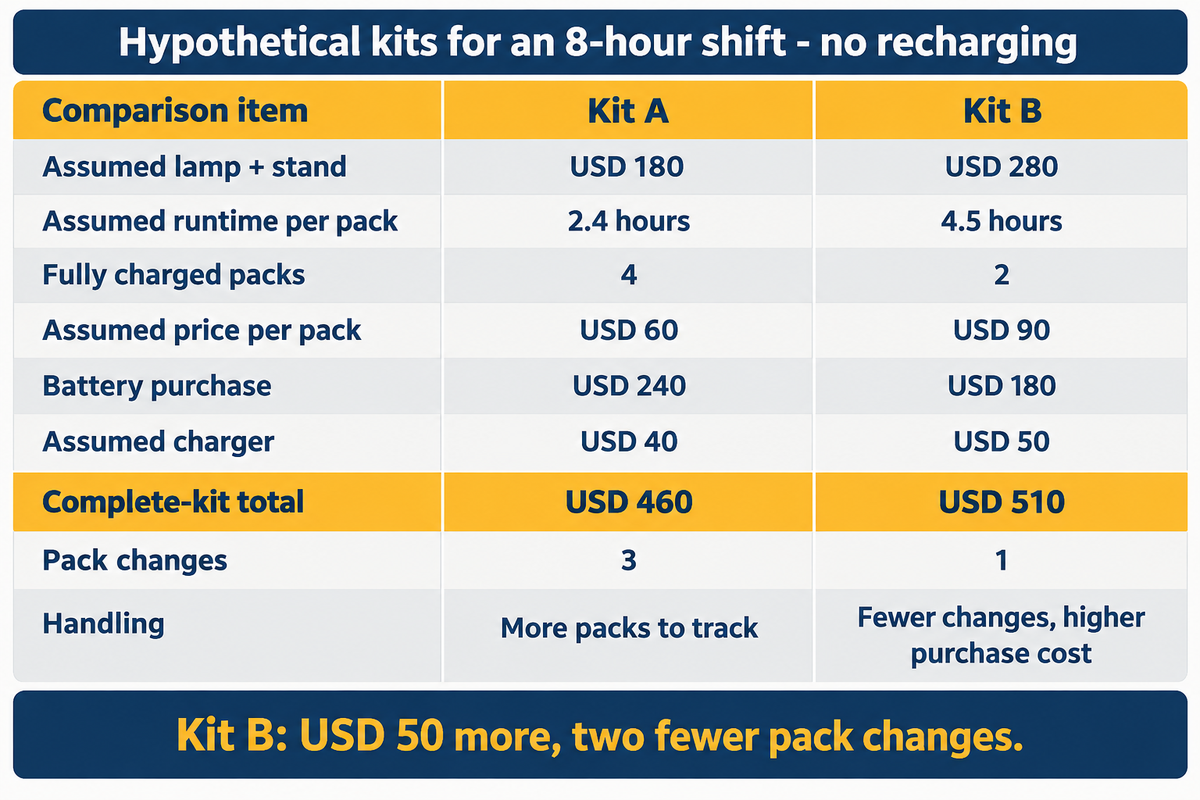
The following hypothetical comparison shows why comparing complete-kit cost and pack changes matters. Both tools must meet the same lighting task for an eight hour shift. Assume fully charged packs and no recharging during the shift. The stated per-pack run times are used for this example.
| Comparison item | Kit A | Kit B |
|---|---|---|
| Assumed lamp-and-stand price | USD 180 | USD 280 |
| Assumed usable runtime per pack | 2.4 hours | 4.5 hours |
| Fully charged packs for 8 hours | 4 packs | 2 packs |
| Assumed price per pack | USD 60 | USD 90 |
| Total battery purchase | USD 240 | USD 180 |
| Assumed charger price | USD 40 | USD 50 |
| Lamp, packs and charger total | USD 460 | USD 510 |
| Pack changes during the shift | 3 changes | 1 change |
| Handling implication | More charged packs to carry and track | Fewer changeovers, higher purchase cost |
Kit A totals 180 + (4 × 60) + 40 = USD 460. Kit B costs USD 50 more and requires two fewer pack changes. Whether that difference has value depends on the actual changeover work and backup lighting needed. Tax, freight, electricity and replacement batteries are excluded from this initial-cost example.
For real offers, use the project quote scope comparison to determine the missing items before comparing totals. Purchasing can price the equipment while maintenance checks charging capacity and spare-part support.
Where Should You Shop, and What Should a Project Quote Include?
The best tripod work light for a defined job may be a retail store kit; use a project supplier when deployment, power or service requirements dictate a configured offer. Send the work area, shift length, access limits and acceptance measurements with the enquiry. Request the exact model and complete part listing.
When examining Home Depot, Lowe’s or Harbor Freight, check the descriptions for bare-tool vs. kit contents, return policy and local service. DIYers may prefer easy tool storage for occasional Do It Yourself garage work. Pro crews may prefer replaceable locks, charging arrangements and repeatable setups. A smart control feature adds value when it solves a real access or adjustment issue.
LFADJ’s portable LED work lights include the LF6119, a wheeled elevated lighting platform. It’s an alternative support format for mobile work, as opposed to a tripod model. Its published configuration combines 2 × 55 W lamp heads with a 21.6 V DC, 34 Ah battery and an 8-hour charging time.
The LF6119 weighs 20 kg and measures 645 × 350 × 210 mm folded, expanding to 645 × 350 × 1860 mm when deployed. Its lamp heads and enclosure carry an IP65 ingress rating, and its stated operating range is −20 to 40 °C. Use the folded-unit clearance check to plan storage and vehicle access; charging conditions need their own check.
Compare a portable light tower to a group of smaller, separate lights. A central tower may decrease the number of stands to move, while separate lights can reach around obstacles. Review the layout and supply arrangement in our portable light tower buying guide to help you decide on the larger tower.
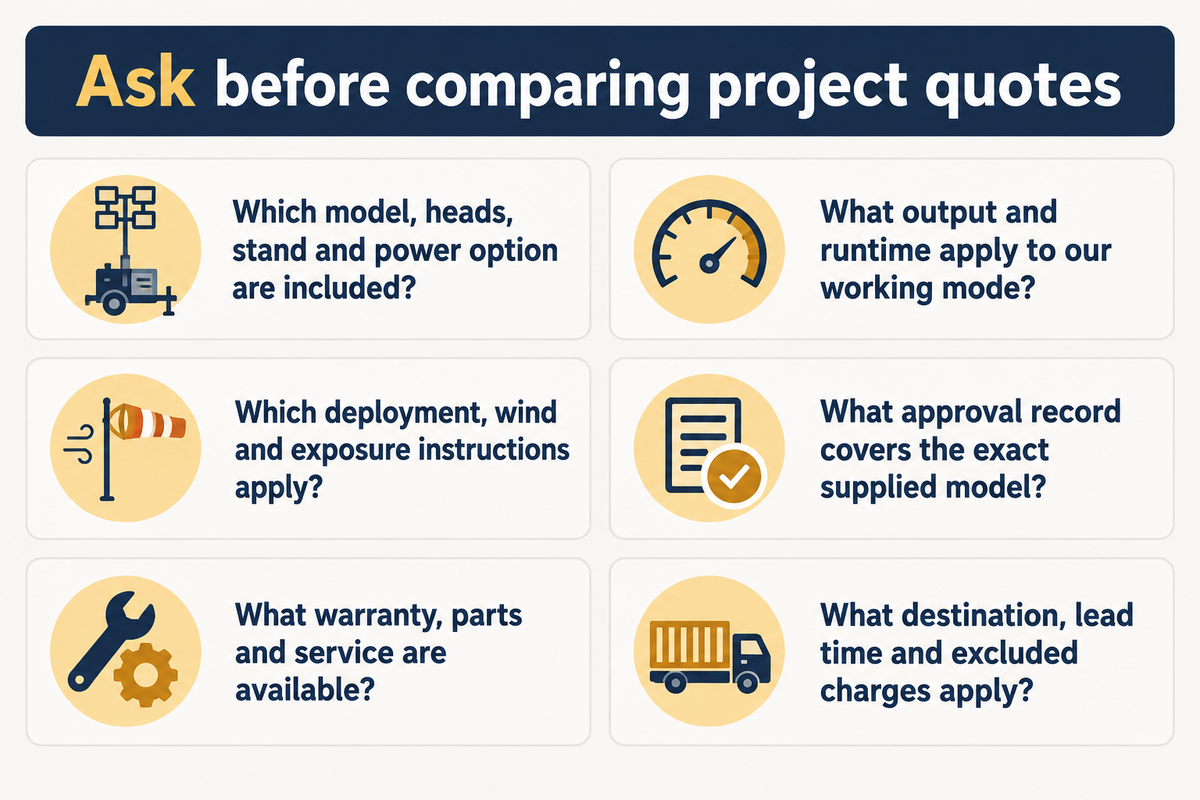
For any supplier, ask the following questions in your purchase inquiry:
- Which model, head arrangement, stand and power option are included?
- What output and runtime apply to the mode used for our task?
- Which deployment, wind and exposure instructions apply?
- What product approval record applies to the exact supplied model?
- What does the warranty cover, and which parts and service are available?
- What are the delivery destination, quoted lead time and excluded charges?
A sample trial should use the same task-plane worksheet that will be used for final acceptance. Keep its observations with the quotation so the ordered specification reflects the setup that worked.
Frequently Asked Questions
How many lumens is best for a work light?
Stand-light examples include 3000-lumen DEWALT and 10000-lumen Husky models, but the best choice is the one that meets your task’s illumination criterion in position. A broad and a narrow beam can give different readings at the same lumen output. Check across the work surface with the lamp, worker and tools in their normal positions.
Can any LED work light fit a tripod mount?
No. The attachment, permitted load and locking arrangement must suit the lamp and support. A matching thread connects the parts but does not establish that the assembled stand is suitable at full extension. Check the approved mounting combination, including any adapter, before fitting a different head to an existing tripod.
How high should a tripod work light be?
Use the model’s permitted range; the BRAUN 71096 adjusts from 47 to 75 inches. Choose the position within that range that clears the obstruction and avoids glare from normal working positions. If a person still blocks the beam, add another lighting direction. Recheck task illumination after changing height or aim.
Will a rechargeable work light last an eight-hour shift?
It can, with enough charged capacity and planned changeovers. In this guide’s hypothetical example, four fully charged packs cover eight hours at a constant 30 W load, using 80% of each 18 V, 5 Ah pack’s energy. That assumes no recharging during the shift and separate illumination during changes.
Does IP65 mean a light is safe in any outdoor condition?
No. An ingress rating addresses the rated enclosure’s protection under specified conditions. Wind stability, ground suitability, electrical connections, charging arrangements and hazardous-location approval need separate checks. Follow the exact model’s instructions for the assembled setup, including its head and support. Weather can also change after deployment, so reassess the position and exposure when conditions change rather than relying on the rating alone.
What should a complete work-light quote contain?
Include the model, stand, heads, batteries, charger and power arrangements, plus the required operating mode and shift coverage. State the destination, delivery terms, warranty and acceptance checks. Separating supplied items from exclusions makes two offers easier to compare before ordering.
Plan the lighting around your work area
Share the task, operating hours, supply access and transport limits with LFADJ. We can discuss the suitable configuration from our portable work lights range and the information needed for a project quotation. Bring the trial readings so the enquiry starts with the light your crew needs.
Scope: US construction requirements and general selection guidance. LF6119 figures are LFADJ’s published configuration data; site acceptance is tied to the specified deployment and operating conditions.
References & Sources
- Lighting Ergonomics, Survey and Solutions Canadian Centre for Occupational Health and Safety.
- 1926.56, Illumination Occupational Safety and Health Administration.
- IEC 60598-2-4:2017, Portable General Purpose Luminaires International Electrotechnical Commission.
- 1926.404, Wiring Design and Protection Occupational Safety and Health Administration.
- Nationally Recognized Testing Laboratory Program: Frequently Asked Questions Occupational Safety and Health Administration.
- UL 153, Portable Electric Luminaires: Catalog and Scope UL Standards & Engagement.
- Flicker Research US Department of Energy.